How do I set up the Toast POS integration with ChowNow?
To get ready for enabling the integration, you’ll want to:
- Let your Account Coordinator or Restaurant Success Manager know that you want to integrate ChowNow with your Toast system
- Be sure you know your current ChowNow and Toast login credentials
- Finally, confirm that your restaurant is located in the United States. Canadian locations aren’t supported at this time.
In this Article:
- Adding the ChowNow Integration
- Group ID and Location ID
- Configuring the Toast Dashboard
- Dining Options
- Financial Setup
- Service Charges
- Discounts
- Revenue Center
- Link Your Location
- Menu Availability and Channel Visibility
- Confirm Delivery Hours
- Sending Orders
- Kitchen Display Systems
Adding the ChowNow integration on the Toast Dashboard
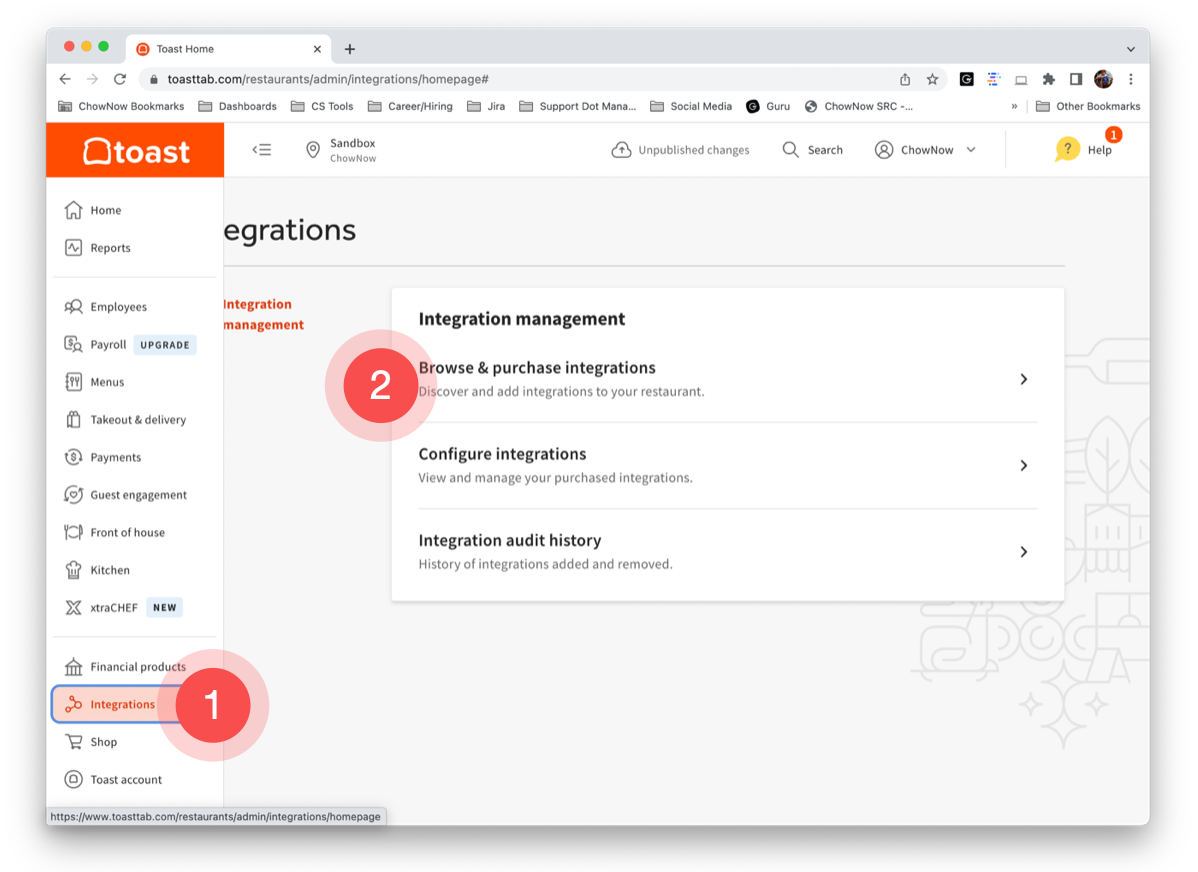
- Click on “Integrations” on the sidebar.
- Click on “Browse & purchase integrations”
![]()
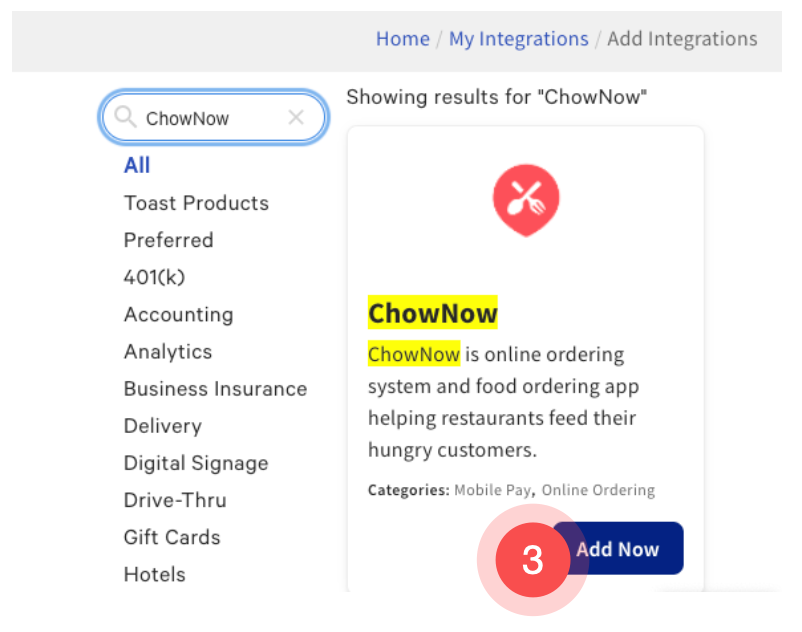
- Search for “ChowNow” and select “Add Now”
![]()
- Scroll to the bottom of the Add Partner page and select “Confirm.”
Finding Your Group ID and Location ID:
For a video walkthrough of these steps, please click here.
- Navigate to dashboard.chownow.com
- Click on “Headquarters” then select the first location you would like to integrated with Toast.
![]()
- From the sidebar, click “Settings” then select “Integrations”
- Click on the Toast Integration Line.
![]()
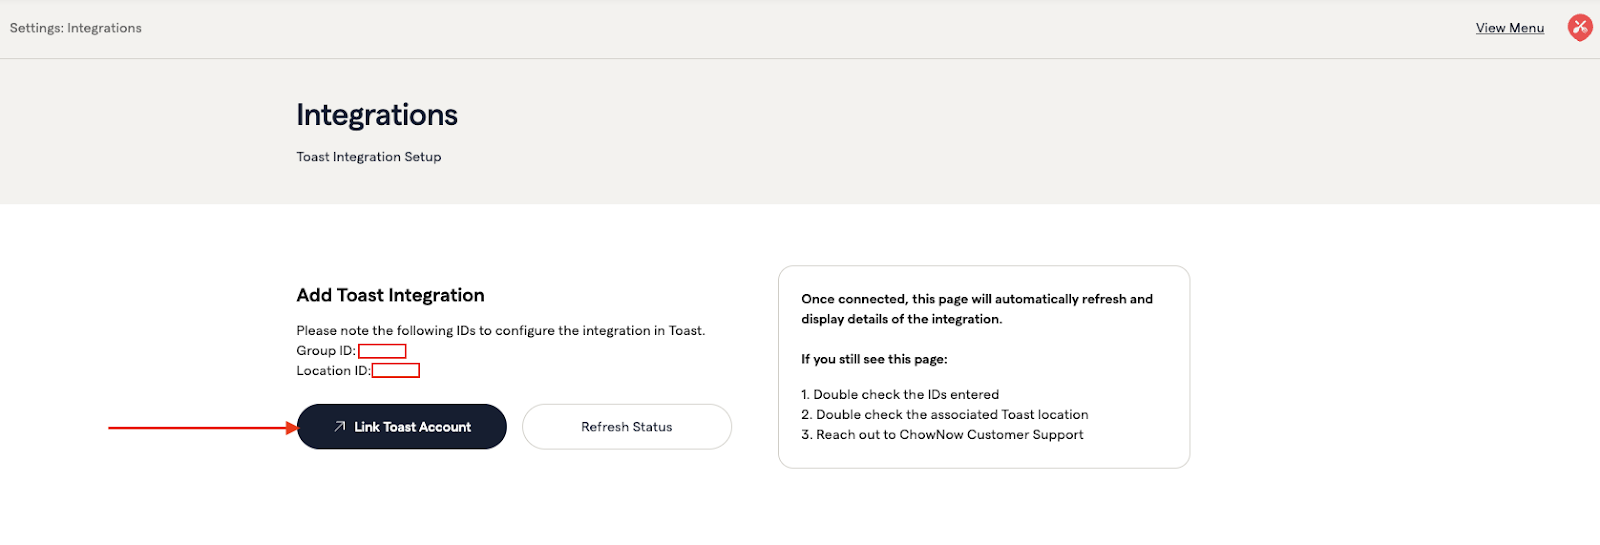
- Take note of the Group ID and Location ID, you will use this information later. Now, you can click “Link Toast Account” which will open your Toast Dashboard in a new browser tab.
![]()
Configuring the Toast Dashboard
For a video walkthrough of these steps, please click here.
- Confirm that the Toast Dashboard is logged-in and displaying the correct location intended for the POS integration.
![]()
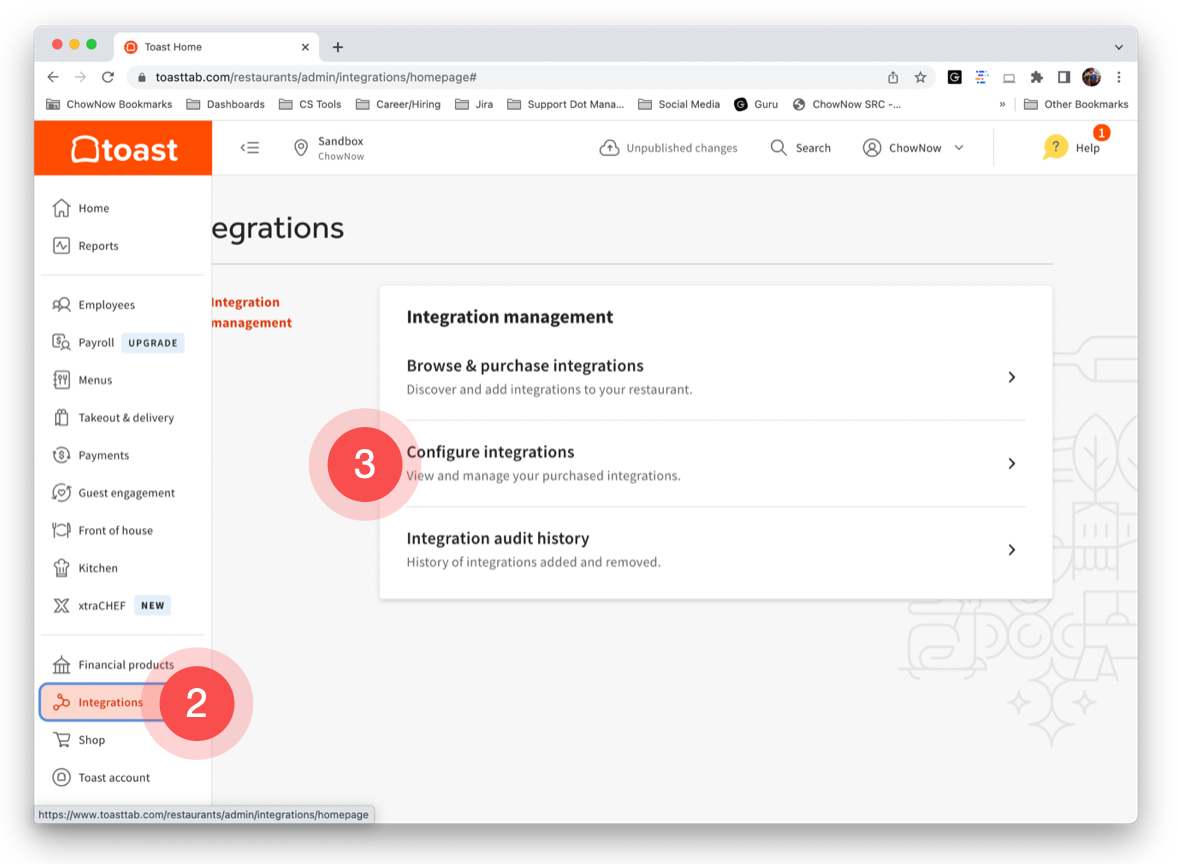
- Navigate back to “Integrations” on the sidebar.
- Click “Configure integrations”
![]()
- Click the Settings icon next to the ChowNow integration.
![]()
- Enter the Group ID and Location ID from the ChowNow Dashboard.
- Click “Apply.”
![]()
Setting Up Dining Options
For a video walkthrough of these steps, please click here.
First, we will configure Toast’s Dining Options based on the types of fulfillment options you currently or plan to use for ChowNow. ChowNow supports Takeout, Delivery, and Curbside.
All of these settings will need to added with the exact same naming conventions stated in this guide. If every letter, the type of punctuation, or the amount of spaces doesn’t match the examples in this guide, Toast will be unable to categorize funds from ChowNow orders appropriately.
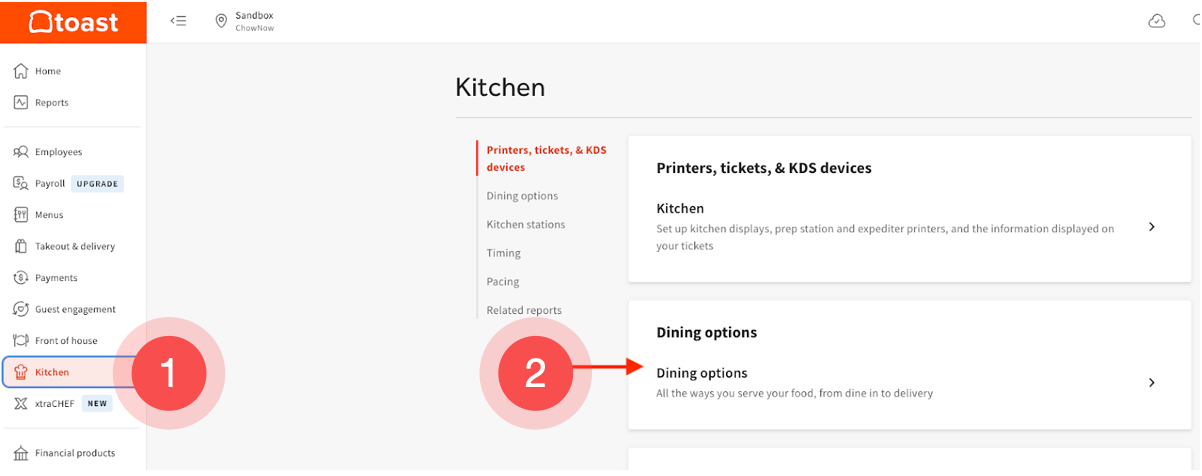
- Navigate to “Kitchen” on the sidebar.
- Click on “Dining Options.”
![]()
- Click “+ Add”
- Type “ChowNow: Takeout“
- Select the matching option from the drop down menu.
![]()
- Following steps 3 through 5, to create a “ChowNow: Delivery” with “Delivery” selected from the drop down menu.
- If your location delivers orders with both in house delivery drivers and flex delivery drivers. Instead of creating a “ChowNow: Delivery” dining option, follow the below steps:
- Create a “ChowNow: In-House Delivery” with “Delivery” selected from the drop down menu.
- Create a “ChowNow: Flex Delivery” with “Delivery” selected from the drop down menu.
- This will help you designate the right courier for each specific order.
- If your location delivers orders with both in house delivery drivers and flex delivery drivers. Instead of creating a “ChowNow: Delivery” dining option, follow the below steps:
- And for the last dining option, create a “ChowNow: Curbside” with “Curbside” selected from the drop down menu.
- Near the top right corner, Click the blue “Save” button and then click “Publish Now.”
Please verify that your settings match the example below:

If every letter, punctuation, or the amount of spaces doesn’t exactly match the example above, order tickets may not print or your KDS system might not display every order.
Note: If your Toast setup utilizes a Kitchen Display System, new dining options will not show up on these screens by default. You’ll need to add the new dining options for each display screen. For more details, click here.
Financial Setup
For a video walkthrough of these steps, please click here.
First, we will create a payment option so ChowNow orders can be tendered.
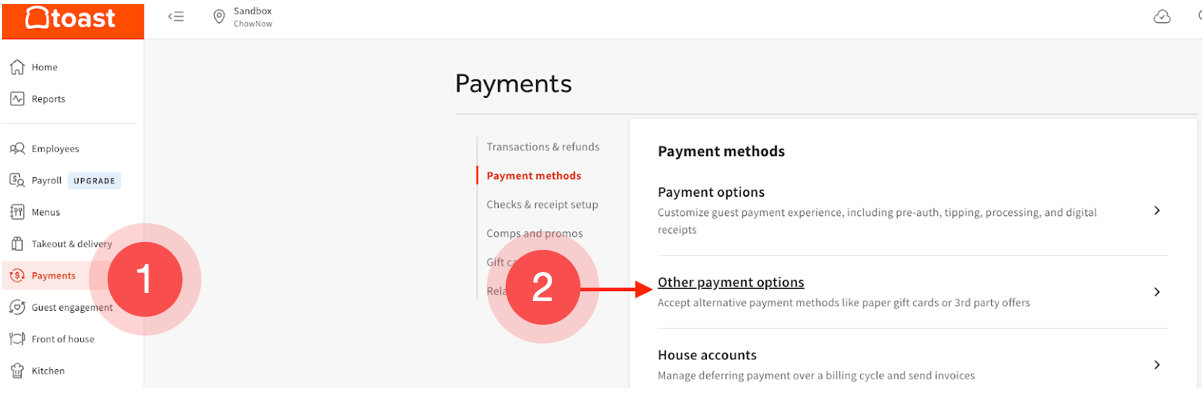
- Navigate to “Payments” on the sidebar.
- Click on “Other payment options”
![]()
- Click “+ add” button and name the payment option “ChowNow”
- There are a few options available when creating a new payment option – we recommend leaving all of them on their default selections.
- If you have an existing payment option named “ChowNow”, just ensure you have the following set as payment options before moving on from this step:
- ChowNow
- ChowNow Tablet
- Click “Save” and then click “Publish Now”
![]()
If every letter, punctuation, or the amount of spaces doesn’t exactly match the examples above, orders might not be forwarded to the Toast system.
Next we will set up 3 new service charges:
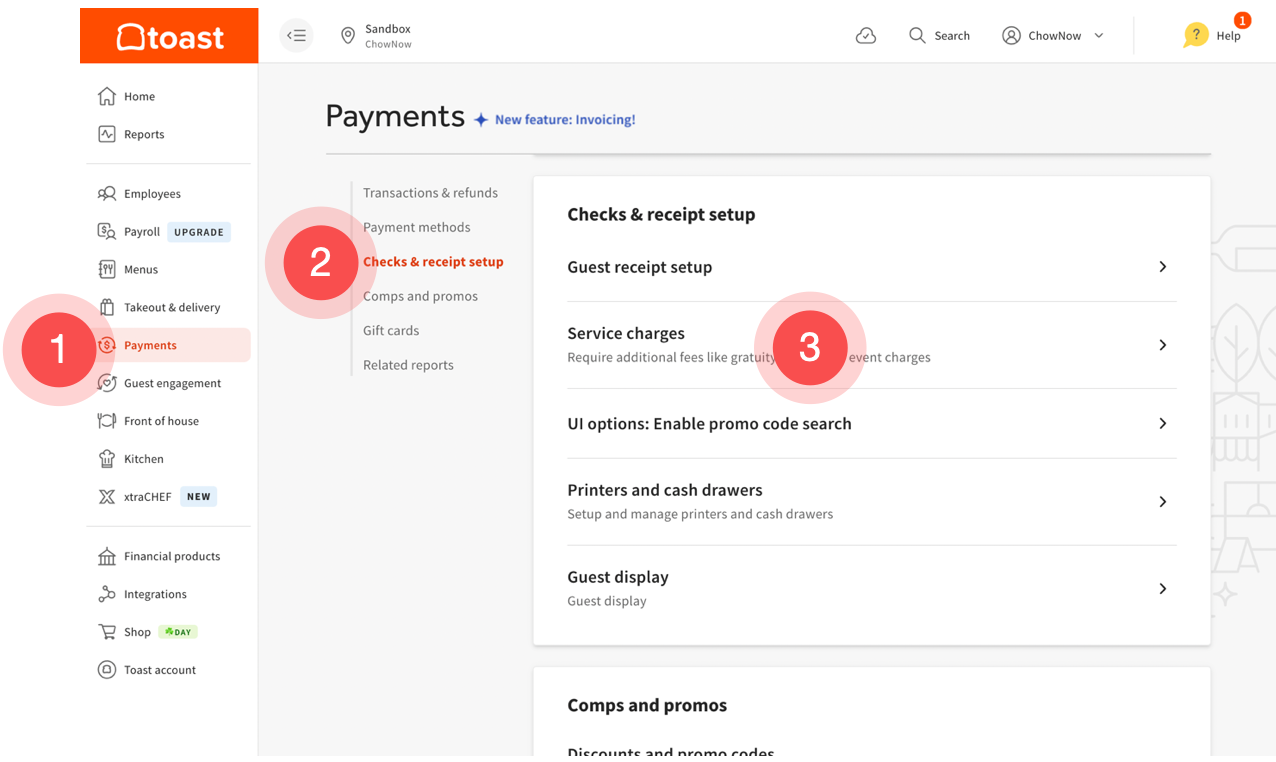
- Navigate to “Payments” on the sidebar.
- Click on “Checks & receipt setup” to jump to that section.
- Click on “Service charges”
![]()
- Click “+ Add”
![]()
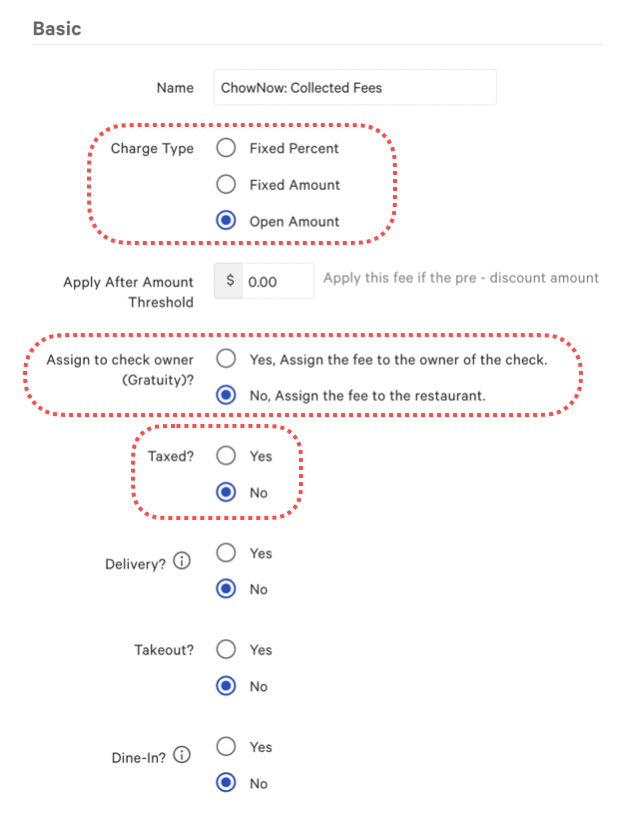
- Name the fee “ChowNow: Collected Fees”
- Charge Type – Open Amount
- Assign to check owner – No, Assign the fee to the restaurant
- Taxed? – Depends on local and state tax guidelines. The most common configuration is “No”
![]()
- Following steps 4 and 5, to create a second fee called “ChowNow: Restaurant Fees”
- Note: Always select “No” under the “Taxed?” setting, for ChowNow: Restaurant Fees.
- And again for the third and final fee called “ChowNow: Delivery Fee“
- Click Save and then click “Publish Now”
![]()
If every letter, punctuation, or the amount of spaces doesn’t exactly match the examples above, disbursement reporting and fee collection might not work as intended.
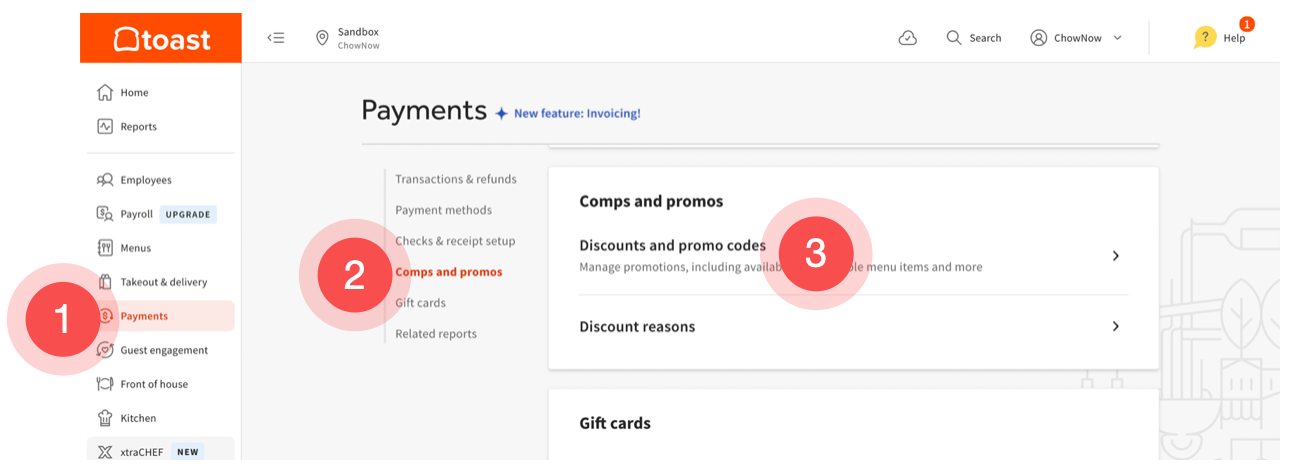
Now we will add a discount setting:
- Navigate to “Payments”
- Click on “Comps and promos” to jump to that section.
- Click on “Discounts and promo codes”
![]()
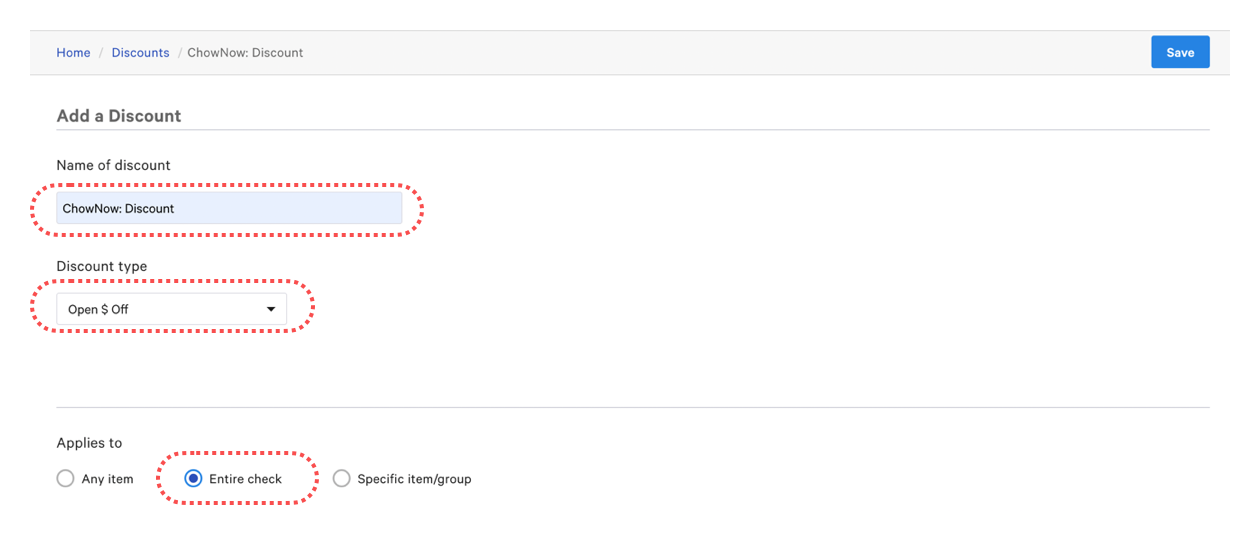
- Click “+ Add a Discount” button
- Name the discount “ChowNow: Discount”
- Discount type – Open $ Off
- Applies to – Entire check
![]()
- Click “Save” and “Publish Now”

If every letter, punctuation, or the amount of spaces doesn’t exactly match the example above, ChowNow orders will not be able to be discounted, causing promo codes to no longer work.
Lastly, we will add ChowNow as a Revenue Center:
- Click on “Front of House”
- Click on “Service areas & tables” to jump to that section.
- Click on “Revenue centers”
![]()
- Click on “+ Add” and name it “ChowNow”
![]()
- Click on “Save” and then “Publish Now”
If every letter, punctuation, or the amount of spaces doesn’t exactly match the example above, this will cause sales reports to incorrectly report on ChowNow earnings.
Link Your Location
For a video walkthrough of these steps, please click here.
- Browse back to the ChowNow Dashboard Integration page, it’s the same page you clicked “Link Toast Account” from earlier.
- Select the location by clicking the radio button next to the name and address, then click “Link Locations”
![]()
- Linking was successful if you see this screen:
![]()
- On the Toast Dashboard, click “Menus” on the left sidebar.
- Click “Advanced properties” then select the correct menu.
- Click on the “New Menu Page” link at the top of the page to view the enhanced menu page.
![]()
- Scroll down until you see “Availability” then click on the “pencil” icon to edit your preferences.
![]()
- Select the days of the week, and a start and end time for this menu. Click Save.
![]()
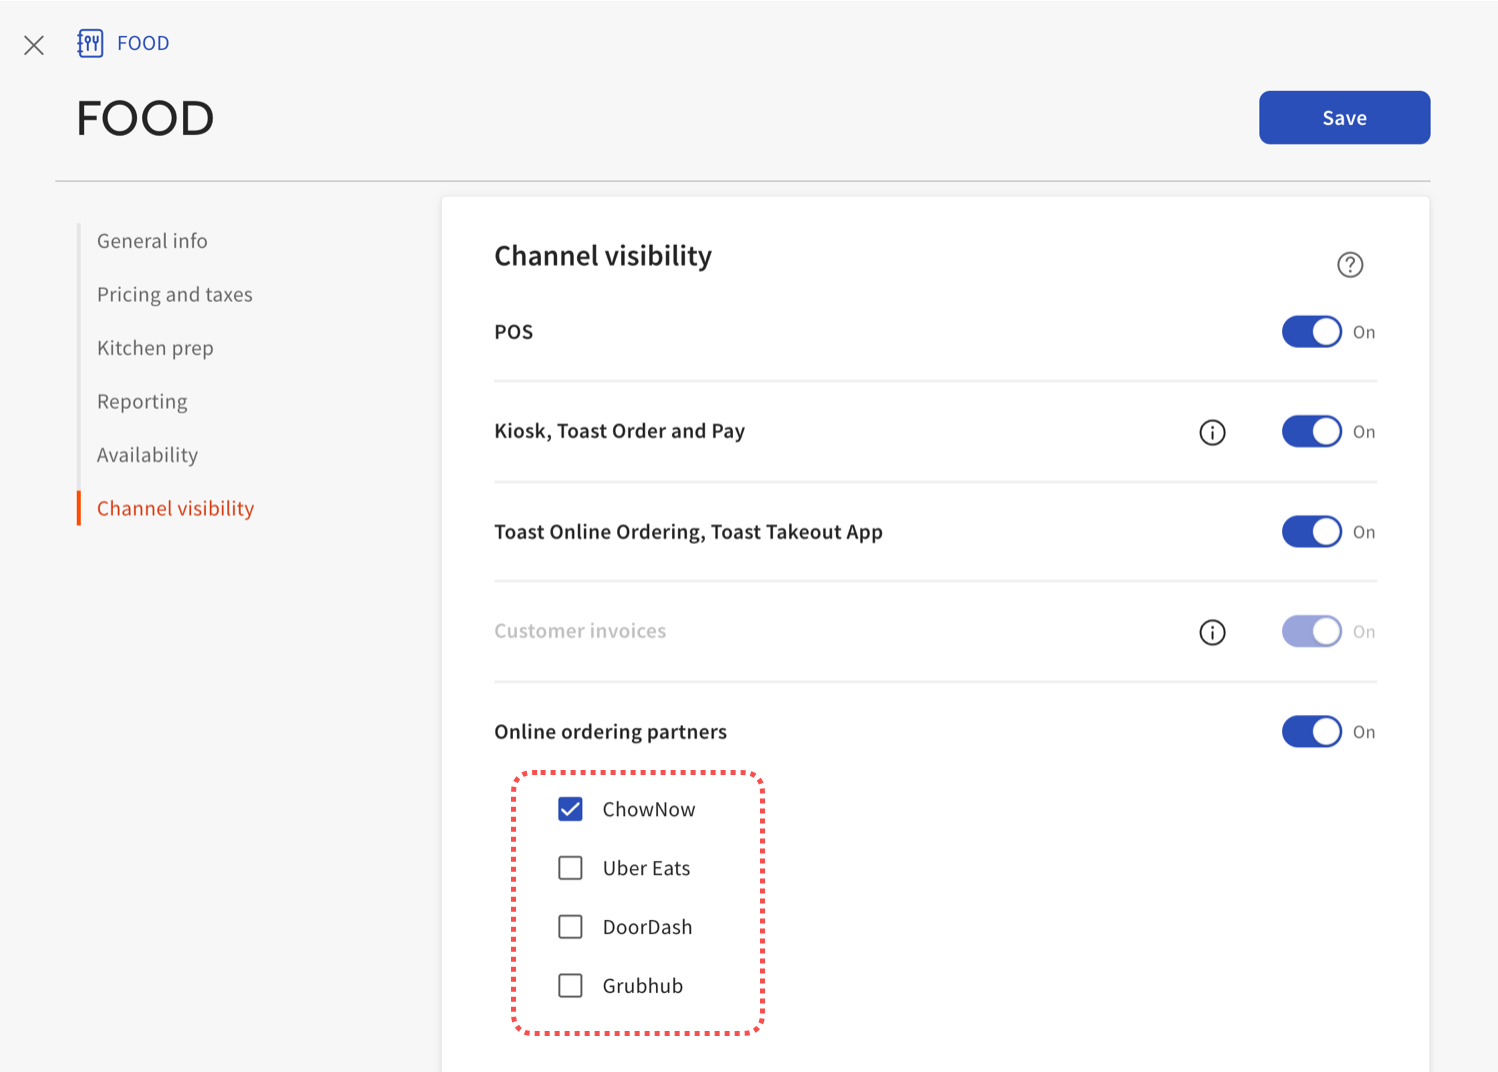
- Continue to scroll down until you see “Channel visibility.” Make sure “Online ordering partners” is on, and then check the box next to “ChowNow.
![]()
Confirm Delivery Hours
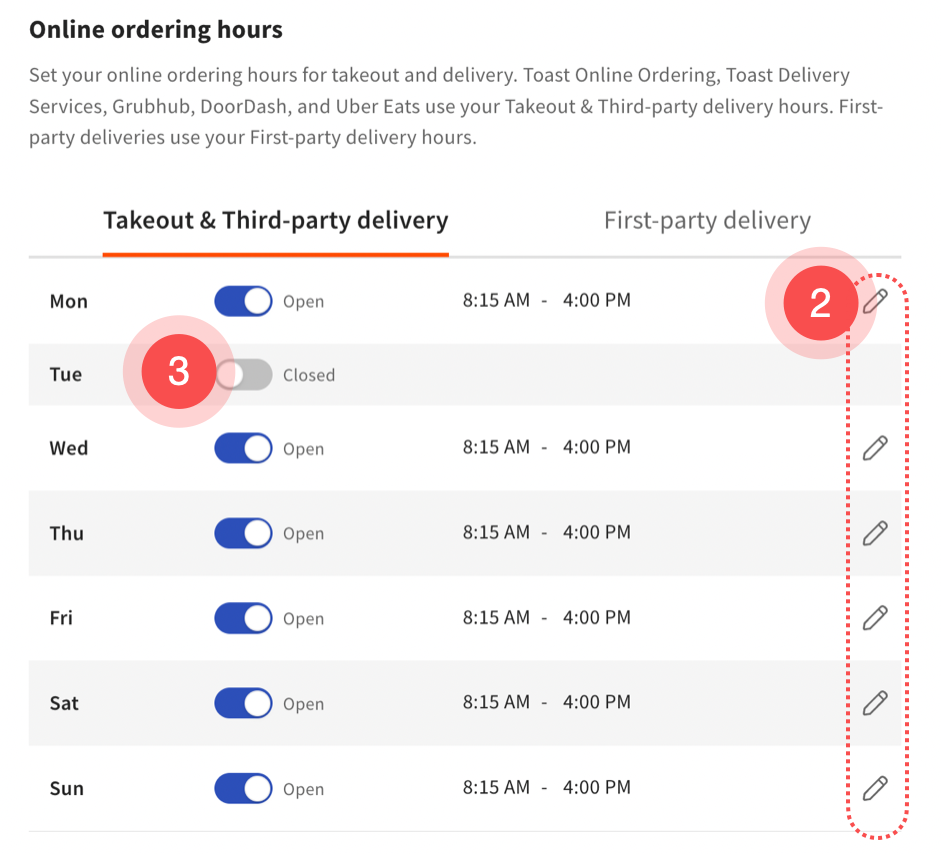
If you offer Flex or In-House Delivery on ChowNow, the delivery hours will match the “Takeout & Third-party delivery” settings found on the Toast Dashboard.
To confirm these settings, follow these steps:
- Navigate to Toast’s Takeout & Delivery settings page.
- You can adjust times by clicking on the pencil icon next to each day.
- And turn off online ordering and delivery for select days by clicking the toggle button.
![]()
Sending Orders
For a video walkthrough of these steps, please click here.
The final step is for ChowNow to starting sending new orders to the Toast POS system.
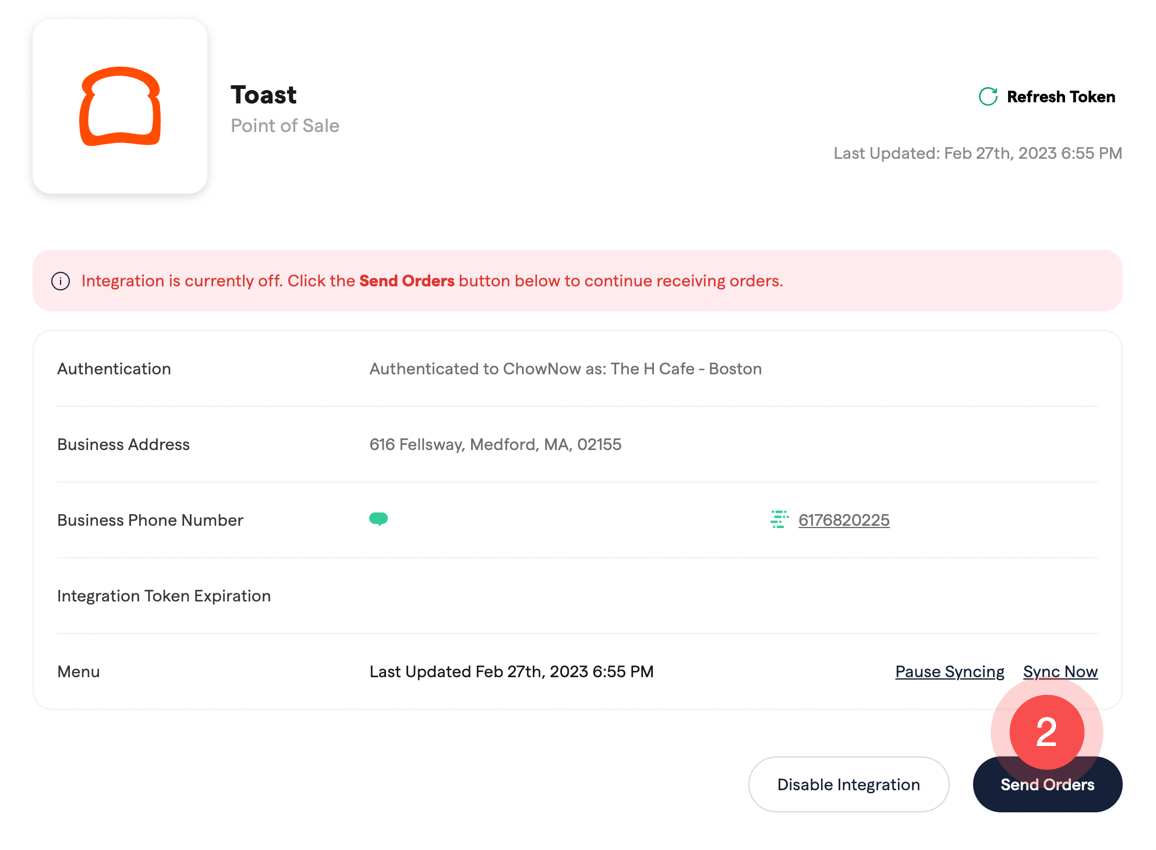
- Navigate back to the “Integrations” page on the ChowNow Dashboard.
- Click “Send Orders” button.
![]()
- Call ChowNow Support and ask them to place a test order for this location. If the order doesn’t get sent to your Toast POS system, our support team can assist and find a solution.
Kitchen Display Systems
When you create new dining options, your KDS will not show the change by default.
Follow the steps below to add orders from your new dining option:
- Select three-dot overflow menu in the top-right corner of your screen and select “Device Setup”.
- Scroll down to the Kitchen Setup section and select “Ticket Display Options”.
- From here, select the “ChowNow” dining options that you’d like to display on the KDS device. It’s important to note that if no dining options are selected, then all of the options will be displayed on the device.
- Select “Continue” to save your selections.
- Repeat this process with each of your KDS devices.
If your Kitchen Display Systems are still not showing ChowNow orders, you can find additional troubleshooting steps here.
